I came across this tarnished bell at a local flea market. It was the perfect candidate to test out my new Grizzly Buffing Polisher! The final results greatly exceeded my expectations.


Polished Bell

Making, Learning, and Exploring
I came across this tarnished bell at a local flea market. It was the perfect candidate to test out my new Grizzly Buffing Polisher! The final results greatly exceeded my expectations.
Polished Bell

I recently upgraded my precision measuring instrument (PMI) toolbox with a lovely Mitutoyo vernier caliper and a Mitutoyo micrometer. They are sweet! Buttery smooth precision.


That being said, I still have an economy Pittsburg Tools vernier caliper acquired from Harbor Freight that has served me well in years past. Especially when you consider it retails for under $20.
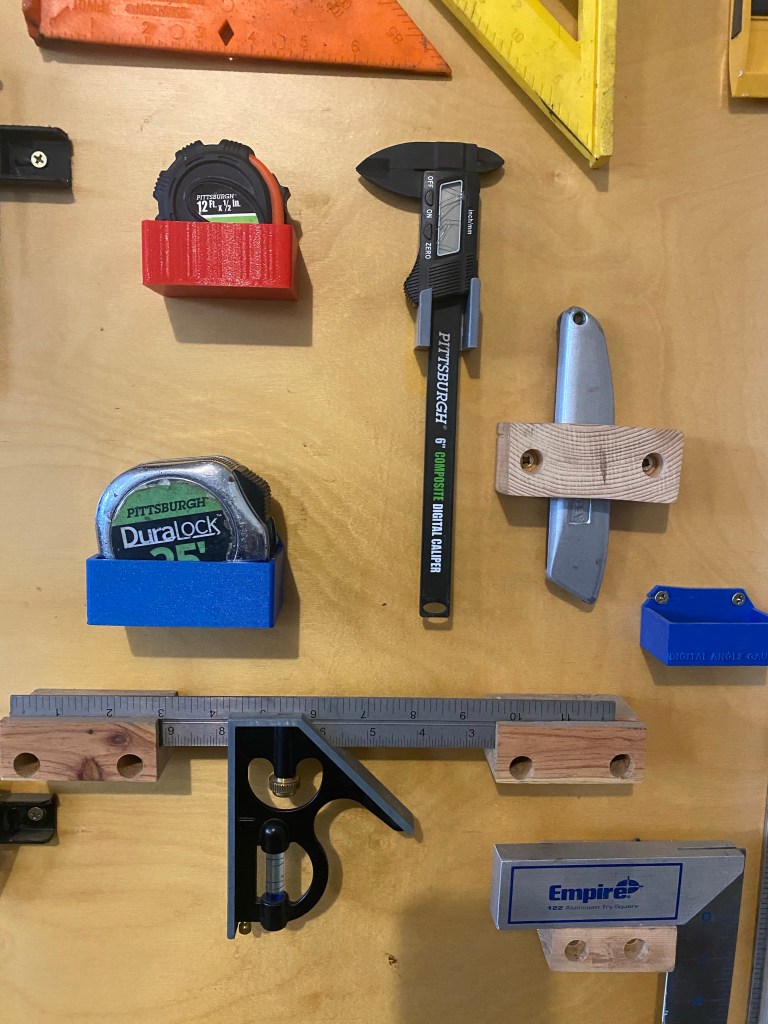
I still like to keep the Pittsburg caliper on my tool wall for quick and dirty measurements that don’t require three decimal place precision. I decided to model up a bracket for 3d printing to mount it on the tool wall.

It took me three iterations to get the model right. The first prototype my mouthing angle for the angled base was off by a few degrees and the upper mounting arms were to thin and aesthetically too flimsy in my opinion.
The second iteration I was able to both add and remove material in various locations to optimize the print time down to 40 minutes.


The pandemic has allowed me the luxury of more time to pour over some of my machinist books. While reading Machine Shop Know How – The Tips and techniques of master machinists, I came across a very enticing project to make a dedicated center drill holder for my lathe tail stock.

I started with a 3MT To 2JT Tanged End Drill Chuck Arbor purchased from Amazon for about $12.
The center drill I selected to be used in the dedicated Morse taper fixture measured in at 0.248. I put the jig in the tail stock and used my relatively new collet chuck to center drill the jig with the collet holding the tool piece. Next the jig was drilled on the JT end just undersized and then finally finished out with a reamer. Again both operations were performed with the collet holding the tool pieces. I had to purchase a custom reamer for this and made the error of buying an exact fix reamer (0.248) which made the fit too tight for the first fit up. (Facepalm). I then ordered a reamer .001 larger (0.249) which after being reamed fit perfectly into the Jacobs taper end of the fixture.


The text states to grind a flat on the center drill bit that will be used to accept the flat of a future set screw. This is best done on the surface grinder since the bit is hardened.
After the center drill holder was properly reamed to accept the center drill tool bit I drilled and tapped the Jacobs taper to accept a #10-24 set screw.


The finished product came out well! I slapped the dedicated MT center drill into the tail stock and put a center indentation in a piece of scrap stock. The center bit did move a little more inwards before fully settling and bottoming into the reamed out hole and the set screw subsequently had to be lightly retightened. Otherwise all was well.
This is a simple tool but one that will add efficiency to the shop. This will be a pleasant addition to my lathe toolset.


After installing the new Digital Read Out (DRO) on my Grizzly 4003 lathe and doing some comparison cuts with the DRO and two micrometers I was made very aware that the preexisting 3-Jaw chuck could do no better than .005″ Total Indicated Runout (TIR) on the lathe. I was craving the ability to get faster more repeatable precision.
This desire for greater precision combined with recently seeing a few random collet chuck videos on YouTube spurred me to desire an entry level 5C collet chuck.
I finally settled upon a Bostar 5C Collet Chuck with D1-4 cam lock spindle mount purchased on EBAY for $139. The collet chuck was promplty shipped and arrived in less than a week.


I found the installation to be relatively straightforward and easy. The old 3 Jaw chuck did need a few taps with my trusty orange dead blow hammer to nudge it lose to get it off. The Bostar 5C Collet chuck went on and I was able to get it to under .001″ run-out in just a few minutes. Success!
Now it is time to do some machining with this thing!
I purchased a Taishi 2 Axis Digital Read Out with precision linear scales for my Grizzly Lathe G4003. The DRO was $265 which seems like a good deal, especially when you compare the price to the Grizzly brand DROs that retail between $700 and $800!


After I ordered the DRO from amazon.com. I got a message from the vendor ( asking me for X axis and Y axis dimensions. For the Grizzly G4003 I sent them dimensions 6.76” x 30.75” (175 mm x 785mm). The DRO was shipped from Guangzhou, China and arrived on my doorstep remarkably in a little over a week. (If I did this over ever again I would add a quarter inch to the size of each scale to ensure the scale is never the limiting factor in axis travel.)
The DRO came with a manual on how to operate the DRO screen, but there were no installation instructions. Buried in the Amazon reviews was a recommendation for watching a YouTube clip by DROPros which I did watch and found very instructive and useful.
The DRO pros video recommended using double sided tape to test drive the setup. I purchased the exact type (3M double sided outdoor tape) but I found the tape to not be strong enough to work in my case. Perhaps if I had wiped down the surfaces more or let the tape set longer it would have worked, regardless it didn’t work in my case and I abandoned the double sided tape fit up attempt.


There was a 0.08 overhang where the fixed sensor head was going to be placed. I decided to quickly model shim to the exact dimensions required and printed it to take up the gap. Entire print time of this shim? 9 minutes! Sweet!


The DRO shipped with variou lengths of 4mm – 0.7 screws. I drilled the linear scale fastener hole closest to me with a 3.5mm drill bit first and then tapped this hole. This was also my first opportunity to use my drill and tap straight-alignment guide fixtures. (I bought these at Cabin Fever Expo 2020). I used a transfer punch to set the location in the middle of the slotted hole on the linear scale end.


I did each step very iteratively. After drilling and tapping the first hole I re fit up the scale and then punched the second hole. I drilled and tapped that and then after successfully mounting both of the holes for the scale I did each home for the sliding sensor one at a time as well. Take your time and iterate.

After I mounted the X axis scale I discovered a new dilemma; the cable routing up and over the saddle was highly unsatisfactory to me. Searching for answers I stumbled across an internet post where someone was recommending you mill a small slot and route the cable straight through and under the slide itself. Initially I scoffed at this idea but later came to realize this was the only workable solution. This was going to require some serious disassembly on my Grizzly G4003 lathe!
WARNING: Getting the saddle off is a major pain on the rear! the rear ways weren’t too hard to get off but there were 2 fasteners on the front side that I simply could not reach with my wrench. Perhaps there is an alternate way to get these Seriously hard to access fasteners off is unknown to me, if I had to do this again I would write Grizzly for advice. Ultimately I had to loosen the upper saddle cap screws and then slip a hack saw into the slit between the upper and lower components to cut the 2 roll pins connecting it to the base so I could shift and slide the upper part of the saddle left or right to get to the final inner way fasteners. I was extremely displeased at the end of this because I accidentally nicked my cross slide wheel with the hacksaw when cutting the roll pins. My lathe is going to have some battle scars after the installation of the DRO


For the Y axis I mounted the scale directly to the bed. It should be noted the bed is a casting so it has a slight draft angle. I used a single washer as a spacer and a carpenter level for the initial layout. I milled a flat bracket 1/4” piece that could screw directly into the prexisting chip cover holes and put vertical slots in the bottom to fit up the sensor. I 3d printed a slotted block to take up the gap between the plate and the sensor. I put a matching angle in the slotted 3d block.


My understanding is the G4003 and G4003g are very similar in form, fit, and function. The G4003G is the gunsmith model and has a few more upscale features, but it is my assumption the concepts presented here should work on the G4003g model as well.

Did I mention I hate pegboard? I hate it, flimsy and ugly! I’m on a mission to custom print every tool holder for my custom made tool wall that is finishing out nicely. After making a socket holder, I decided it was time to make some holders for my disorganized socket sets. I made one set of shallow holders for metric and one for SAE for my 3/8 drive socket wrench.


I’m trying to decide if I like having the letters in an engraved or embossed format.
Next up I’m going to design and print one for my deep socket set. after that is done I’ll make a set for my 1/4 and 1/2 socket sets.
My YouTube feed got bombarded with vise restoration videos last fall. I’ve been using a Harbor Freight vise in the interim that worked fine enough but I felt it just didn’t have that panache that an old school heavy duty vise would bring to the shop. I was on the lookout for a vise to make my own.
I happened to be chatting with my Dad on the phone while he was visiting the Jacktown Engine show in Bangor, Pa and on a whim I asked him to be on the lookout for a vise for me. No longer than two minutes later he called me back to say he stumbled upon 3 chunky vices for sale. We agreed to get the largest – A Charles Parker No. 974.


The vise was solid, but cosmetically it needed a lot work. It was mostly covered with hard caked grease, rust, and remnants of paint. I disassembled the entire vise which wasn’t too hard to accomplish. I was happy I didn’t have to mess with any caustic paint remover and I buffed off the majority of the surface scale with a wire wheel on my bench grinder. I moved in and hit the nooks and crevasses with a cup wire wheel on my angle grinder.

I used a spray paint rattle can of grey primer and put on a final coat of blue enamel spray paint and hit it with a final coat of clear coat.


I used a white paint pen to trace the raised letters. This part of the restoration is most pleasurable!


Before the refurbishment, this chunk of metal was just a vise that I owned, after the final painting and assembly it became “my vise”. The entire process turned out to be much easier than I had expected and anyone with a wire wheel, patience, and some elbow grease can refurbish a rusty old vise into a shop gem. My only complaint is the Charles Parker vise jaws are a very unique design and don’t readily lend themselves to easy customization or replacement. I was fortunate the jaws on this model are ina satisfactory state. Other than that the Charles Parker vise is a majestic relic of the American industrial era.
I’d like to try my hand at refurbishing a Reed vise next.


Tonight I finally scratched a big itch of mine to design a quick lift and go tool holder for my drive ratchet set. I had a good idea in my head how I wanted it to work. It didn’t take too long to model it. I was very pleased with my first prototype. The color of the bright metallic blue of this ProtoPasta filament I’ve recently switched over to looks brilliant and is remarkably sturdy. I NEED to try some of the Neon yellow of this type of filament!!!


