Socket wrench tool holder3d printed socket head ratchet holder on Prusa i3Mk3s
Tonight I finally scratched a big itch of mine to design a quick lift and go tool holder for my drive ratchet set. I had a good idea in my head how I wanted it to work. It didn’t take too long to model it. I was very pleased with my first prototype. The color of the bright metallic blue of this ProtoPasta filament I’ve recently switched over to looks brilliant and is remarkably sturdy. I NEED to try some of the Neon yellow of this type of filament!!!
COVID-19 quarantine continues and the extended time at home has presented another opportunity to pursue another passion project – performing every experiment in the Make: Electronics book, cover to cover with my children.
Make: Electronics Learning by Discovery by Charles Platt
I didn’t want to piecemeal acquire the parts and potentially have any delays when we got started. The quarantine has noticeably exacerbated shipping delays. When we got started I wanted to be able to stream roll through the book. The second edition has a checklist appendix of all the supplies required and I purchased them all on amazon.com piecemeal in one fell swoop. (I know there are kits out there for this book, but I wanted to get lots of spares so both children could work simultaneously under my tutelage. You can never have enough LEDs, am I right?
Make: Electronics – the components acquired piecemeal via amazon
Make: Electronics Chapter 1
Experiment 1: Taste The Power
The kids were amazed at the tingle on their tongues! We were off to a good start
Experiment 2: Let’s abuse a Battery
This was a good experiment to discuss the concept of short circuits and the engineering reason for having a fuse in a circuit as an electrical safety feature. I had a leftover spare 3 amp circuit in hand that we used for the experiment. The children again were amazed how hot the wires and batteries got for this experiment. It was exciting to see the fuse blow under real-time observation.
Experiment 3: Your First Circuit
We opened up my old resistors and they had become jumbled and to my dismay the packs were not labeled. This was the perfect opportunity to introduce the multimeter and take the time to measure and label the resistance of each pack. It took a while to execute but the children were pros at this activity at the end.
The children were tasked with measuring and labeling all of the resistance values.
After the values were all measured and the resistor packs were sorted by least ohms to largest ohms we made our first battery-resistor-led circuit. We started with the largest value resistor which produced no light and then decreased the value which demonstrated an increasingly brighter LED.
Experiment 4: Varying the Voltage
Experiment 4: Varying the Voltage
With the concept of resistors mastered from the previous experiment, it was relatively easy for the children to grasp the concept of a potentiometer varying resistance as evidenced by the dimming LED with the turn of the knob. I admit – in a 2020 digital world there is something so gratifying about the smooth velvety feel of the analog knob of the potentiometer. Velvety smooth!
Experiment 4: Varying the Voltage
Experiment 5: Let’s Make a Battery
We didn’t have much success with this experiment. We got some voltage out of our setup but not much and not enough to light an LED. I don’t think we had enough fresh lemons and we substituted what I believe were galvanized washers in place of the galvanized metal plates, so perhaps one of these elements was a contributing factor.
Conclusions
Make: Electronics Chapter 1 was complete! The children were able to use a multimeter, understand the concept of voltage, current, and resistance. They built their first circuits, made LEDs light up and dim, and explored the use of a potentiometer. We were off to a good start!
Now that I have had my Prusa I3 MK3S 3d printer for 4 months I have had an educational time upgrading the unit with aftermarket add-ons promoted by the 3d printing community. Obviously, one of the neatest aspects of the unit is that it can print it’s own upgrades!
Modified Duct Fan
Prusa Delta P Duct Fan Upgrade
The stock shroud that comes with the base kit was flimsy and chunks were occasionally meting off and falling in my prints. I stumbled upon the Delta P duct fan upgrade in a Reddit post. You can download the info and plans here. At the start I printed it and installed this fan configuration because I thought it simply looked really cool, but I’ve come to the opinion that this configuration is superior to the base configuration that comes with the printer. I do believe the fan runs quieter, is more structurally stable, and that it does a more precise job of ducting the air to the nozzle base.
Silicone Sock
Aftermarket 3d Printer Hot End Silicone Sock
I read about these after fixing a clog in my E3D V6 hot end a few weeks ago. The aftermarket hot end Silicone Sock runs about $8 and is well worth a try. The silicone sock keeps your hot end insulated, keeps it clean, and prevents against stray filament curling around, sticking to the hot end and the associated risk of creating a filament blob. There is a small risk the silicone sock could come lose and fall into your print during operations, but to date mine is fastened snugly on the hot end without issue since installation. In my opinion the silicone sock has done a great job to keep the hot end clean and in general improves the quality and reliability of the print.
Silicone Sock
Filament Extrusion Visualizer
The last upgrade I’ve made is a filament extrusion visualizer. This add-on is more aesthetically fun than anything else, but does have some minor functionality by quickly enabling you to observer how the extruded is operating at any given time.
The Prusa Extruder Visualizer tutorial has mostly windmill and screw type designs, but I chose to go with a nostalgic wind up toy configuration, but there are many fun Options to choose from. I’ve seen YouTube videos where the windup knob appears to crank in time lapse videos which also adds a pleasing visual effect. (Tinkering with 3d printing time lapse is on my to do list)
The set up is simple. You print your extruder visualizer, and then take a tiny Neodymium magnet
(8x3mm) and super glue it to the printer extrusion visualizer componen. The magnets make for interchange options.
Another weekend of COVID-19 quarantine lockdown means another weekend to dust off some of the STEM projects Santa Claus gave the kids this past Christmas that were sitting in the basement 😉
Elenco Amerikit Learn to Solder Kit
The kit impressed me. It comes with a decent soldering iron and a simplistic but effective stand for the soldering iron when not in use.
We divided work on the kit into two days . The first day they practiced soldering the pads on the circuit board and then soldering wire to the board.
My daughter is practicing her soldering skills
On the second day we assembled the kit. Along the way we got to discuss resistors, capacitors, transistors, and potentiometers.
Some of the electronics that came with the Elenco Amerikit learn to solder kit
After the kids had the basics of soldering down and were comfortable using the equipment we pivoted towards assembling the actual kit. I think it took us about 2 hours of relaxed zen-like soldering to complete the kit. It was very relaxing and enjoyable actually.
The kit is supposed to have flashing LEDs and a European siren when completed. We were able to get the LEDs to perform the alternating blinking pattern but alas, we could not get the siren to work on either child’s kit. We spent a good half hour troubleshooting, but in the end my hunch is that we may have applied too much heat to the 555 timer chips.
Final Thoughts:
We were somewhat disappointed we couldn’t get the siren to play after all of the components were soldered to the board, but I chalk that up to user error on our part. The real goal of having the children obtain a real world STEM skill of soldering was successfully accomplished. The kit was very effective at teaching this skill. Santa picked out a fun, practical, and educational gift for the kids to grow their soldering skills.
I’ve been experimenting with printing face-masks to wear during the pandemic.
The .STL file was downloaded from Thingiverse .com and then printed on my Prusa I3 Mk3S 3D printer. I love the Prusa 3d printer. It is so choice. If you have the means, I highly recommend picking one up.
The parts for one COVID-19 mask take approximately 7 hours to 3D print.This 3D print of 3D COVID-19 masks took 18 hoursFinished and assembled COVID-19 mask 3D printed on my Prusa I3 Mk3S
A HEPA filter from a HVAC unit or a vacuum cleaner bag can be cut to make the masks filter unit. I don’t have flexible filament on hand so the the mask is rigid. A rubber weather strip gasket can be used to line the interior for a gasket effect.
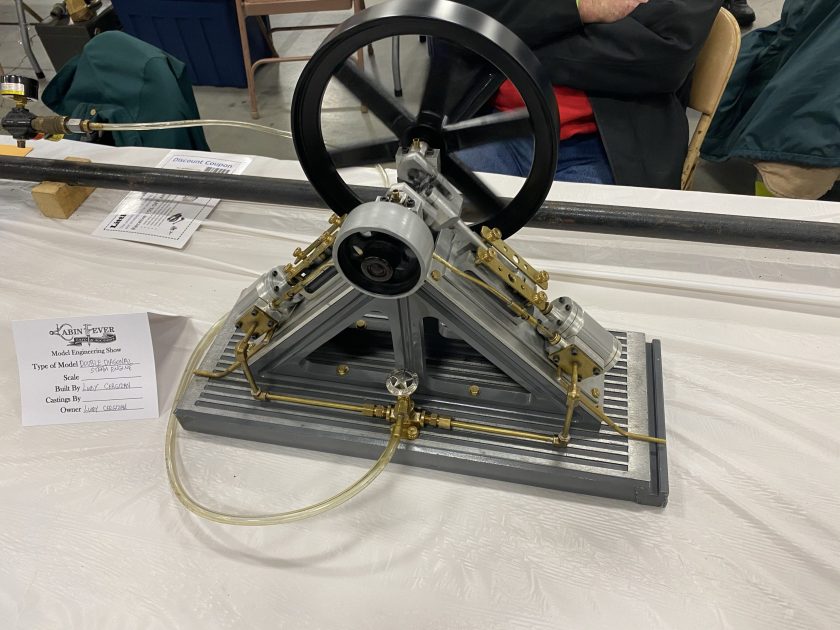
One of my main reasons to acquire a Bridgeport milling machine and Grizzly lathe was to scratch this itch of mine to build model steam engines. It’s hard to explain, but I hear a calling to build these things. I got the idea to look for a model engine show for some inspiration and mentoring last February 2019, so I was very dismayed to learn that I had just missed one of the largest model engineering shows in my backyard by a few weeks: the Cabin Fever Expo held in Lebanon, PA. I marked Cabin Fever Expo 2020 on my calendar and waited with patience! After declaring my intent to attend this event, I was grateful to have my son state he was willing to tag along. After a somewhat grueling two hour drive on a blustery day into Pennsylvania in moderate sleet and snow we arrived!
The Cabin Fever Expo appears to be segregated into 4 areas, there are tool and part vendors, an ongoing auction with mostly model train parts for sale, a main hall with the model engines, a hall with consignment items for sale, and another hall with model boats, cars, tanks, etc.
We spent the majority of time in the main hall with the model engines. The craftsmanship is humbling. What used to be a practical trade has become a lost art of craftsmanship and manual precision engineering.
Obviously, we couldn’t leave empty handed! We purchased some lathe tool bit inserts, a coaxial indicator for the mill, a drill bit guide, and a beginner model engine castings kit.
Santa got us a Prusa i3 MK3S 3D printer for Christmas . I’ve seen the Prusa crew and their printers in action several times at the NYC Maker Faire and at other smaller MakerFaire over the past three years. Make magazine has printed several articles in their “best gear” editions and the Prusa printers are almost unanimously identified as the best bang for the buck.
The unboxing of the Prusa i3 MK3S
The Prusa model comes in two options. There is a preassembled option for $999 and a build it yourself option for $750. I opted to go for the DIY built it yourself model. I’ve believed the only way to have a fully fundamental understanding of how the device works is to build it from the ground up. I also figured if the printer needed any future maintenance, repair, or installation of upgrades I would need this knowledge of how everything comes together.
Fasteners, fasteners, and more fastenersIt comes with all the tools you need to assemblePartially assembled with a pause to eat the fabled Harbo gummy bears
The Build
I assumed the build would take a few hours (initially I just assumed less than 3). I was so naive! I read online that an average build time to put the 3d printer together can easily take 10 hours. I think mine took close to 16 hours. I really took my time with setting the tension of the belts and the final electrical wiring. If you are going to build your own printer from the Prusa kit I would recommend setting aside a large chunk of time (about 4 hours) over three days.
The kit comes with the infamous bag of gummy bears which seem novel at first, but rewarding yourself with the very specifically prescribed number when you finish the macro level sections of the build is surprisingly very rewarding and fun.
If you take your time, don’t rush, and read the instructions carefully, then almost anyone should be able to do this build. The final wiring up of all the servos, sensors, and power cables is relatively easy, it just requires a very slow and methodical attention to detail. I can’t tell you how relieved I was when the LCD powered on and fully successfully performed all of the calibration checks!
I did the majority of the build on the dining room table with my son and daughter watching closely beside tme. The build is an excellent way for young minds to see mechanical engineering principles slowly combine and manifest into a fully working device. As we built the printer we discussed concepts such as servo motors, the concept of a power supply, gears, set screws, linear bearings, hardened rods, extrusion nozzles, and sensors. I can’t understate the educational value of this build for young engineering minds.
First 3d print – A whistle!
Our first print was a whistle from the supplied SD card. It took about 20 minutes. After we got the hang of setting up the printer we printed a vase, a pug dog figure, and a gear set from files included with the SF card from Prusa. I am still amazed at the quality of the print. The detail exceeded my expectations. Simply unbelievable!
Ant weight “pusher” battle bot combat robot 3d printed by Prusa i3 MK3S
Since the main reason for getting the printer was to generate prototypes for combat robotics we pulled an ant-weight combat robotics .STL file from thingaverse to print. This print room about 6 hours. We let it run overnight, and like magic it was waiting for us there in the morning.
3d printed antweight combat robot body
Conclusions
Embrace technology! I’m excited for the moment when some small part breaks around the house and we can re-engineer a CAD file to print a replacement part on the spot. Just having the device here has me thinking about ways to use this new in-house (pun intended 😉 ) capability. The Prusa 3D printer models are the best value for your dollar and are an affordable foray into on-the-spot design and manufacturing. Building the unit from the parts level is a labor of love and an experience to be cherished.
I was able to pair up a family trip to Disney with a side trip to the Orlando Maker Faire. My parents who had previous plans to take the Amtrak Auto Train from DC to Florida were gracious enough to let me pack my power racing series go kart into the back of their van for the ride down to Orlando. This allowed me the good fortune to participate in the final and grand finale race of the PRS season. (Not that I had any chance of winning anything, I’m still towards the back of the pack. It’s hard to describe how much fun it is to race in these events though).
Black and Yellow Tubs!
The race organizers for this location decided to skip the traditional orange and yellow jersey barriers and tried out a track border consisting solely of water filled Stanley Tool tubs. The corners and turns of the track were plated with plywood shielding to deaden impacts.
This Stanley tool tub track border setup had pros and cons. The tubs sit lower to the ground and allow greater visibility of the entire track for the spectators and the drivers, but when you crash into the Stanley tool tubs they spill a lot of water onto the track making it a mess while racing. This phenomena also creates a negative cascading effect as the track got more slippery more track border impacts occurred. I was soaked after every race (but it was FUN!).
Ooogah Horn!
The only mod to my vehicle for this PRS race was the addition of a Harbor Freight oogah horn. I added a small momentary switch button to the steering wheel and mounted the horn to the exterior of the electronics enclosure. This is the first time I’ve raced with a horn and found it comes in handy when passing slower cars on the corners.
Robot Ruckus: Combat Robotics
Maker Faire Orlando was also hosting a combat robotics event called Robot Ruckus this weekend. This was my family’s first exposure to combat robotics and I think my son was hooked on this event after watching the larger robots battle it out in the big arena. I ordered a battle bots 101 book when I returned home for some future research.
This was my third year attending this event and it has grown considerably year over year. The event this year hosted a blacksmith, educational tech talks on a variety of topics, and my favorite – pumpkin trebuchets!
It’s my hunch that the race here this year served as a geographical proxy for the abruptly cancelled New York Maker Faire for many teams. Many of the individuals I spoke with mentioned the extreme disappointment upon hearing NY World MakerFaire was cancelled. There were 12 working teams in attendance. The track is unlike the others – it’s on dirt, grass and gravel and the drifting was superb in this environment. Who doesn’t enjoy a little cart drifting?
Upgrades
I added a 48V to 12V buck converter to my power series race car and used this to power a brushless 12V electronics fan in order to cool the speed controller which had overheated inside the ammo box at the Atlanta race. (An attachment fastener is missing in this video clip)
Results
The new brushless motor setup combined with the cooling fan worked excellent. My car was finally starting to be quasi competitive. I occasionally pass a racer or two! The first race I had transponder issues but believe I came in fourth or fifth place. Much to my surprise I came in 3rd on the second race of the day and got my first legit podium appearance! For the third race of the day I had two collisions on the track and my speed controller was acting abnormally and I was unable to finish the race.